TIME TO CLEAR THE WAY... THE WAY TO HYGIENICALLY CLEAN DISHES
Hygiene is everything in the kitchen. Even small errors or lapses in concentration can harm hygiene – and the consequences can be serious. Food can be ruined or, much worse, customers can become ill.
The rule in the dishwashing area: operators must ensure that the washware arrives with the customer in a completely hygienic state, i.e. there can be no health risks from the surface.
In times of salmonella or SARS-CoV-2 outbreaks, there can be no mistakes with hygiene. But that's OK because they are avoidable using MEIKO technology, the right planning and proper processes.

WHAT TO REMEMBER IN THE PLANNING PHASE
From the ‘Commercial warewashing and hygiene’ fact sheet from VGG (Industrial Dishwashing Association’)
The planning phase sets the course for the best possible hygiene standards in the dishwashing area. So what does that look like?
Well, that of course depends on the conditions of the room and the dishwasher! There is one factor to consider whether you opt for an undercounter, hood type, flight type or rack type machine: always split the space into a clean and dirty side.
This separation helps to prevent recontaminating dishes that have already been washed, breaking chains of infection.
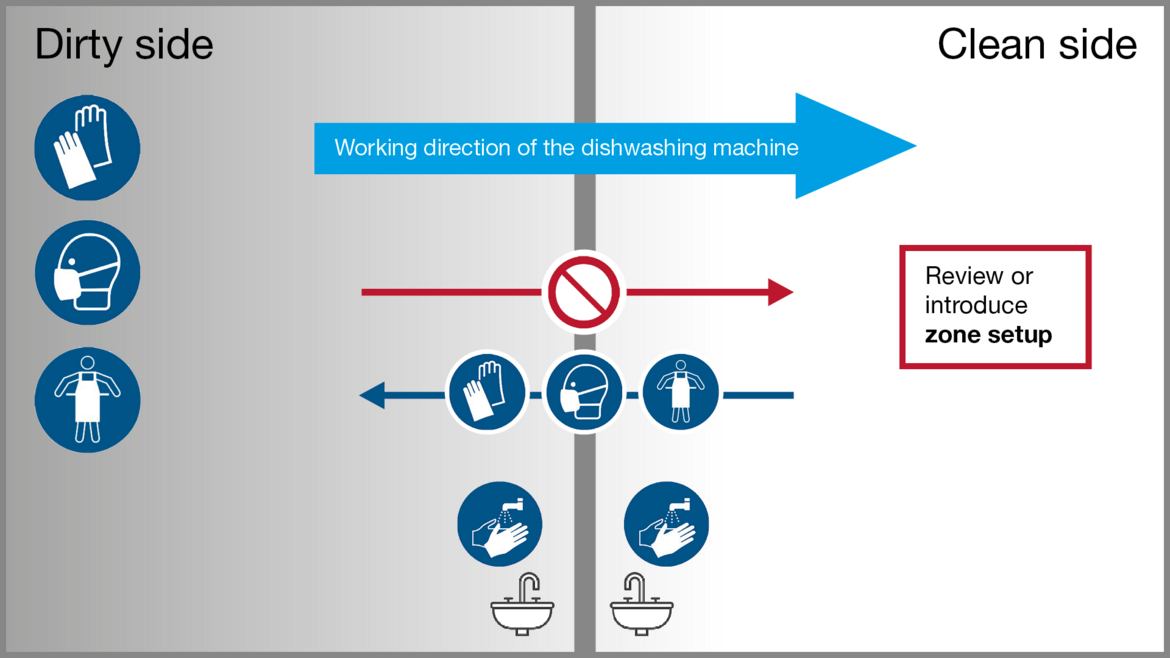
Take a look at this schematic plan showing the planning for a model dishwashing area and the construction requirements to be fulfilled.
PLANNING EXAMPLE

- Dirty side = collection point for dirty washware
Only work here with sufficient PPE - Clean side = collection point for clean washware
Only work here with clean hands or clean gloves - Ideally, install a physical divider between the clean and unclean sides
- If that is not possible, maintain strict separation between loading and unloading the dishwashing machine
- Clean and dirty washware must not cross paths
- Provide opportunities for hand washing when moving from the dirty to the clean side
- Provide opportunity to change disposable gloves when moving from the dirty to the clean side
- Revisit or introduce zone setup for room ventilation: low pressure on the dirty side and high pressure on the clean side can prevent dirt travelling through the air and contaminating the clean side. Important: unfiltered external air must not be used to ventilate the clean side.
White paper on dishwashing area design
There's a lot to consider when planning a dishwashing area: the size of the room, work processes, hygiene standards, workplace ergonomics, the right warewashing technology. Read all about these factors and more in the white paper.
Download now
WHAT TO REMEMBER WHEN DEALING WITH PROCESSES
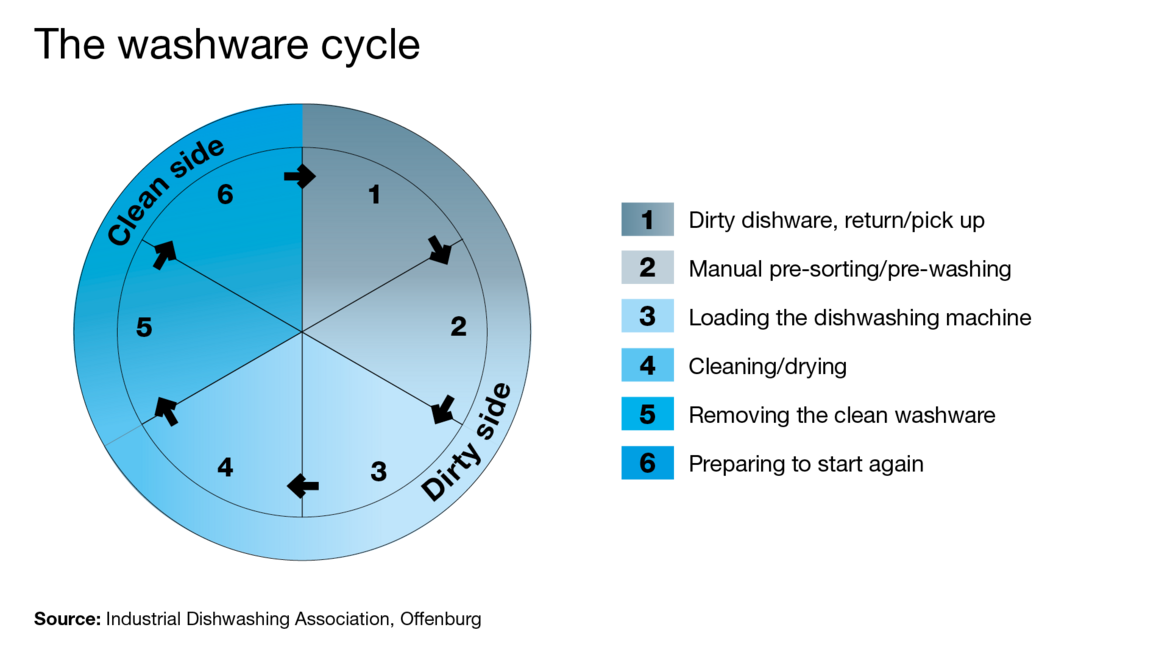
In the cleaning process, the washware moves through a cycle: from being cleared from the table to being ready to serve to the next customer. The operator must ensure that the washware is not recontaminated in this cycle. Read on for what to remember at each step of the process.

Step 1: return/pick up
- Only work with dirty washware with sufficient PPE.
- Used washware can be moved back to the kitchen using clearing tables, conveyor belts or open/closed containers/carts.
- The return point for used washware should be set up for maximum capacity. There needs to be sufficient return capacity provided for the volume and type of washware.
Step 2: pre-sorting/pre-washing
- The time food waste has to dry onto the washware should be kept as short as possible! That limits microbe multiplication and makes cleaning easier.
- Food and other waste must be cleared and removed from the washware, either manually or by machine.
- Ideally, dishes are cleared with no additional use of fresh water, e.g. by mechanical scraping.
- Special attention should be paid to routes used for removing food and other waste.
- One especially hygienic option for processing food waste is to use a food waste treatment system by MEIKO GREEN. This does away with any need to manually carry waste as it can be disposed of on the spot.
Step 3: loading the dishwashing machine
- We recommend sorting cutlery into a cutlery quiver and pre-treating it in a heated cutlery soak cart using a detergent that will not froth in a commercial dishwashing machine.
- Suitable dish and glass racks should be available for other types of washware, or, in the case of a conveyor dishwashing machine, a suitably equipped conveyor belt.
- Even running of processes should be assured even at full capacity.
Step 4: cleaning/drying
This takes place inside the dishwashing machine and marks the transition from the dirty side to the clean side."
Step 5: unloading
- Only work with clean washware with clean hands or clean gloves.
- Damp washware must not be stacked, that is in the case that design features do not ensure that the washware is dried completely.
- The washware must not be dried or polished by hand as this harms hygiene.
- Standing water and damp towels breed germs, making them a hygiene risk.
Step 6: getting ready to serve again
- Provide sufficient storage space for the clean washware, where it will not get dirty again even if the dishes are stored for an extended period.


